CUDA-Q 컴파일러의 환상적인 세계에 본격적으로 뛰어들기 전에, AST 재작성의 기술에 대해 간단히 메모해 두는 것이 좋겠다고 생각했습니다.
AST 재작성과 컴파일의 차이점이 무엇인지 궁금할 수 있습니다. 간단히 말하면, 모든 컴파일에는 AST 재작성이 포함되지만, 모든 AST 재작성이 컴파일에 해당하는 것은 아닙니다.
또한 컴파일은 한 언어의 코드를 다른 언어의 코드로 변환하는 과정인 반면, AST 재작성은 일반적으로 동일한 언어 내에서 이루어집니다.
파이썬 추상 구문 트리(AST) API Link to heading
Python은 AST 작업을 위한 표준 라이브러리를 제공합니다. Python AST에는 대략 네 가지 범주의 노드가 있습니다.
리터럴 또는 상수 Link to heading
예를 들면 10, "hello", True입니다.
Constant(value=10)
Constant(value="hello")
Constant(value=True)
변수 Link to heading
예를 들어 x, y, z와 같은 변수는 읽기(로드) 모드 또는 쓰기(저장) 모드로 접근할 수 있습니다.
Name(id='x', ctx=Load())
Name(id='y', ctx=Store())
표현식 Link to heading
예를 들어 1 + 2, x + 2, x > y와 같은 표현식이 있습니다. 표현식은 값을 생성하는 AST 노드입니다.
BinOp(left=Constant(value=1), op=Add(), right=Constant(value=2))
BinOp(left=Name("x", Load()),op=Add(),right=Constant(value=2))
Compare(left=Name("x", Load()),ops=[Gt()],comparators=[Name(id='y', ctx=Load())])
문장 Link to heading
예를 들어 if, for, while, return, break, continue 등이 있습니다. 문장은 AST 노드로서 동작을 수행하며 파이썬 코드에서 최상위 또는 블록 수준 구조로 나타납니다.
예를 들어, 다음 코드:
if x > 1:
    pass
는 다음과 같습니다:
If(
    test=Compare(left=Name("x", Load()),ops=[Gt()],comparators=[Constant(value=1)]),
    body=[Pass()],
    orelse=[]
)
구체적인 예: 양자 커널의 조건문 Link to heading
이 코드를 바꾸고 싶다고 가정해 봅시다.
@kernel
def conditional_play(qubit: Qubit):
    iq = qubit.ancilla.readout()
    if iq.i > 0.5:
        qubit.main.play("waveform")
~ 안으로
def kernelized_conditional_play(qubit: Qubit):
    iq = qubit.ancilla.readout()
    with cc._if(iq.i > 0.5):
        qubit.main.play('waveform')
핵심은 iq가 파이썬 인터프리터가 아닌 양자 컨트롤러에서 평가되어야 하는 런타임 Readout이라는 점입니다. 이를 위해서는 kernel 데코레이터를 생성해야 합니다.
class kernel:

    def __init__(self, func):
        self.func = func

        # Uncompile wrapped function (convert it into a string)
        source = self.decompile(func)

        # Parse the string into an AST
        tree = self.parse_to_ast(source)

        # Transform the AST, converting the "if" into "with if_()"
        tree = Transformer().visit(tree)

        # Recompile the AST into a binary
        binary = self.recompile(tree)

        # Make a namespace for execution
        namespace = func.__globals__.copy()
        # This does not really executes the function, but rather creates
        # a new function based on the modified AST
        exec(binary, None, namespace)

        # The new function is now available in the namespace
        self.kernel  = namespace["kernelized_" + func.__name__]

    def __call__(self, *args, **kwargs):
return self.kernel(*args, **kwargs)decompile, parse_to_ast 및 recompile은 표준 라이브러리 함수(inspect, compile)를 감싸는 간단한 래퍼일 뿐입니다.
def decompile(self, func):
    return inspect.getsource(func.__code__)

def parse_to_ast(self, source: str):
    return compile(source, filename="<generated>", mode="exec", flags=ast.PyCF_ONLY_AST, dont_inherit=True)

def recompile(self, tree):
    return compile(tree, filename="<generated>", mode="exec", dont_inherit=True)
이 트랜스포머는 ast.NodeTransformer의 하위 클래스로, AST를 순회하여 모델의 제너레이터로 변환합니다. 이는 모든 AST를 다른 모든 AST로 변환하는 데 사용할 수 있는 매우 일반적인 디자인 패턴입니다.
class Transformer(ast.NodeTransformer):
    """
    This subclass traverses the AST of the user-written, decorated,
    model specification and transforms it into a generator for the
    model. Subclassing in this way is the idiomatic way to transform
    an AST.

    Specifically:

    1. rewrite all `if` statements into `with cc._if()` blocks
    2. rename the function to `kernelized_` + original function name
    3. Remove the @kernel decorator to prevent from recusion
    """

    def visit_If(self, node):
        self.generic_visit(node)
        modified_node = ast.With(
            items=[
                ast.withitem(
                    context_expr=ast.Call(
                        func=ast.Attribute(
                            value=ast.Name(id="cc", ctx=ast.Load()),
                            attr="_if",
                            ctx=ast.Load(),
                        ),
                        args=[node.test],
                        keywords=[],
                    ),
                    optional_vars=None,
                )
            ],
            body=node.body,
        )

        ast.copy_location(modified_node, node)
        ast.fix_missing_locations(modified_node)
        return modified_node

    def visit_FunctionDef(self, node):
        modified_node = node
        # Rename the function to `kernelized_` + original function name
        modified_node.name = "kernelized_" + node.name
        # Remove the @kernel decorator to prevent from recusion
        modified_node.decorator_list = []

        # Copy the source location of the original node
        ast.copy_location(modified_node, node)
        ast.fix_missing_locations(modified_node)

        # Do not forget to visit the children of the node
        self.generic_visit(node)

        return modified_node
여담 Link to heading
파이썬 문장을 QCS ISA로 변환하는 “커널” 데코레이터 개념을 도입하는 것은 다소 혼란스러울 수 있습니다. 만약 데코레이터를 적용하는 것을 잊어버린다면 어떻게 될까요? 파이썬 인터프리터가 평가를 수행하기 때문에 커널 코드가 작동하지 않게 되어 개발자에게 큰 혼란을 줄 수 있습니다.
하지만 이 문제에 대한 해결책은 여러 가지가 있습니다. 정적 분석 도구, 즉 린터를 사용하여 함수에 kernel 데코레이터가 적용되었는지 확인할 수 있습니다. 특히 LLM을 사용하여 코드 재작성을 자동화하기 시작할 때 이 방법은 매우 효과적일 수 있습니다.
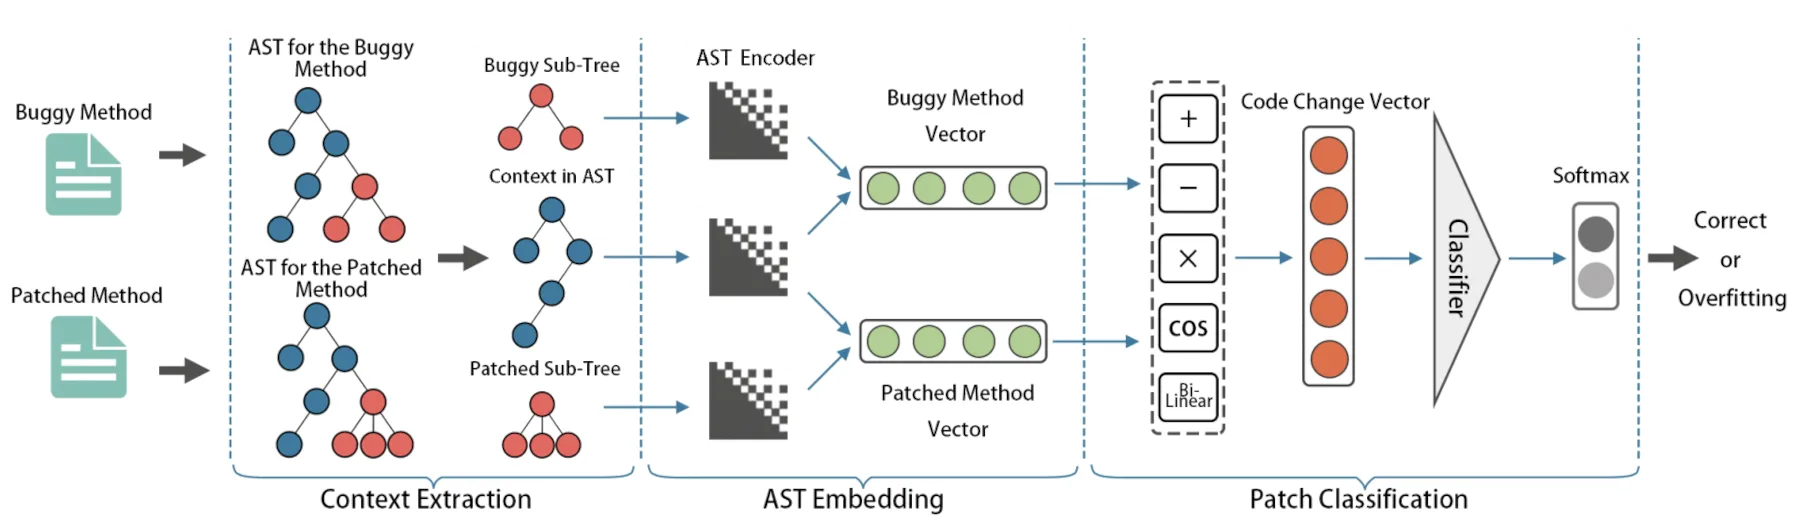 (이미지 출처: 컨텍스트 인식 코드 변경 임베딩)
결론 Link to heading
이 간단한 메모에서는 파이썬 함수의 AST를 매우 간단한 방법으로 재작성하는 것이 가능하다는 것을 보여드렸습니다. 이 방법을 사용하면, 복잡한 with _xxx 구문을 사용하지 않고도 양자 제어 스택에서 실행될 수 있는 양자 커널을 훨씬 쉽게 작성할 수 있습니다.
물론, 업계가 양자 컴퓨팅을 위한 MLIR 방언을 사용하는 통합 LLVM 기반 스택으로 빠르게 나아가고 있는 상황에서 파이썬에서 AST를 조작하는 것이 무슨 의미가 있느냐는 질문이 나올 수 있습니다. 실제로 그렇습니다. 다음 메모에서는 MLIR을 사용하여 동일한 결과를 얻는 방법을 보여드리겠습니다.
M-Labs의 NAC3 컴파일러도 살펴봐야 할 것 같습니다. CudaQ와 비교했을 때 NAC3는 Rust 기반 구현을 사용합니다. Python 코드조차도 Rust 파서를 사용하여 AST로 변환됩니다. 하지만 코드 생성은 적어도 RISC-V 소프트 코어의 경우 LLVM에 위임됩니다.
한편, 이 메모는 파이썬 AST에 대해 배우는 재미있는 방법이었으며, 이는 아직 LLVM을 사용하지 않는 기존 파이썬 기반 양자 회로 컴파일러를 개선하는 데 유용할 수 있습니다!
References Link to heading
- Context-Aware Code Change Embedding for Better Patch Correctness Assessment
- AST-Enhanced or AST-Overloaded? The Surprising Impact of Hybrid Graph Representations on Code Clone Detection
- Hacking the Import System and Rewriting the AST For Durable Execution
- Peeking into the internals of Python’s ‘functools.wraps’ decorator
- Adventures in Manipulating Python ASTs
- Learn Python ASTs, by building your own linter
- Abstract vs Concrete Syntax Trees
- Using syntax trees in Python
- Artiq Compiler
- NAC3
- MLIR
- The State of Pattern-Based IR Rewriting in MLIR